
In this blog post I describe how to setup Ubuntu Linux and Oracle Java on my newly acquired Google Nexus7 device. This shall be the foundation to checkout the things you can do with JavaFX on a Tablet computer.
My environment is a Macbook Pro (MBP) running on OS X 10.8 (Mountain Lion). The Nexus 7 (in my case the 16gb version) is attached to the MBP via its USB cable.
Download images for your Nexus
Visit the following URL and download boot.img and rootfs.img appropriate to your device’s hardware setup http://hwe.ubuntu.com/uds-r/nexus7/
Download Android Development Tools
To install the Ubuntu image on your Nexus 7 we need the “fastboot” command line utility from the Android Developer Tools. You can either choose to download the Android Developer Tools from the Android website or use a customized download of “fastboot” from github:
- Android Developer Tools (ADT) http://developer.android.com/sdk/index.html#mac-bundle
- ADT direct download http://dl.google.com/android/android-sdk_r21-macosx.zip
- Alternative version for Linux and Mac https://github.com/teamblueridge/adb-fastboot-install
Installation of the Ubuntu image
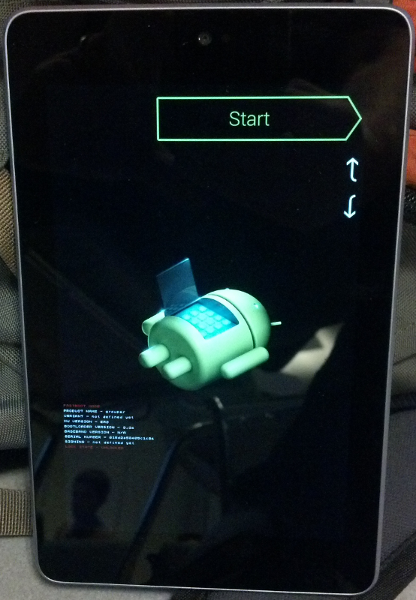
Now you need to shutdown your Nexus. When it’s shut down connect it via USB to your Mac or PC and bring up the Bootloader (a.k.a. “fastboot”) by holding down the “Vol -“ button and then pressing the power button. The Ubuntu Nexus7 Wiki has a nice screenshot of the screen that should be visible
Next you need to verify that your Mac (or PC) can access your device via USB and fastboot. Therefore do the following
$ cd /Users/ahe/dev/tools/adt-bundle-mac/
$ sdk/platform-tools/fastboot devices
  1234567891234567        fastboot
The ladder line displays the serial number of your device. Be sure to check it’s the correct device by comparing it to the serial on your device’s bootloader screen.
If not already done you need to unlock your device to be able to install another operating system at all (Please note that you might lose your warranty by this action!):
$ sdk/platform-tools/fastboot oem unlock
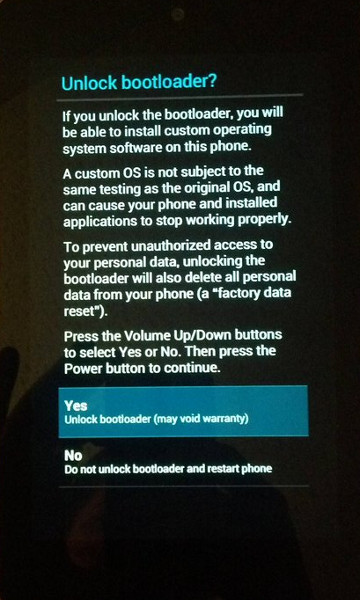
You should immediately see a dialog popup on your device asking whether you really want to unlock (see screenshot from Ubuntu Nexus7 Wiki). Afterwards the unlock process should begin and finish without any error, so you are able to reboot your device into bootloader again:
$ sdk/platform-tools/fastboot reboot-bootloader
If you now look closely at your device there should be a line saying “LOCK STATE - UNLOCKED”.
Now you can install the images
$ sdk/platform-tools/fastboot flash boot UbuntuNexus7/boot.img
$ sdk/platform-tools/fastboot flash userdata UbuntuNexus7/rootfs.img
$ sdk/platform-tools/fastboot reboot
If you encounter an error like the following sending ‘userdata’ (104285 KB)… FAILED (remote: (Nv3pBadReceiveLength)) it means that your USB connection timed out. In this case you need plug out and in the USB cable of your Nexus7 and repeat the least entered command.
Your device should then boot into Ubuntu. NOTE: The first boot takes about 2-4 minutes as the bootloader has to prepare the system.
System stabilization
Once booted and logged in we have to open a terminal window by clicking on the Ubuntu Dash icon (upper left corner) and typing “Terminal” into the search field. In case you cannot type because the onboard keyboard doesn’t appear, you can manually trigger it by clicking on the little icon with the 4 squares in the upper menubar and choosing the “Show Onboard” option.
The first step in the Terminal is to update all your system packages:
$ sudo apt-get update
$ sudo apt-get upgrade
Install bluetooth keyboard
You can read the details on this step here: https://wiki.ubuntu.com/Nexus7/UsingTheDevice
Install the alternative bluetooth daemon
$ sudo apt-get install bluez-compat
Scan for your bluetooth device
$ hcitool scan
Scanning ...
 20:42:A1:00:66:78       bluetooth keyboard
Connect your device via its ID
$ sudo hidd --connect 20:42:A1:00:66:78
The following link has a longer description on how to add a bluetooth keyboard at system start: http://askubuntu.com/questions/17504/how-can-i-have-a-bluetooth-keyboard-auto-connect-at-startup
Install OpenSSH as recovery console
To be able to interact with the device when the X11-Server crashes (or you chose an unusable Desktop environment - like me I wanted to try “Openbox”) your first step should be the installation of the OpenSSH server.
$ sudo apt-get install openssh-server
Via “ipconfig” you get the ip of your device and can login from a remote machine (username: ubuntu; password: ubuntu).
Decrease memory consumption
On of the Known Issues is a quiet large memory consumption of the unity desktop. To compress memory and decrease memory consumption you can install the following
$ sudo apt-get install zram-config
Another way would be to install a more lightweight desktop environment like LXDE $ sudo apt-get install lxde
Installing Oracle Java
For my installation I used Oracle JDK 7 (1.7.10 Developer Preview available here: http://jdk7.java.net/fxarmpreview/)
$ sudo mkdir -p /opt/java
$ wget http://www.java.net/download/JavaFXarm/jdk-7u10-ea-fx-8_0_0-embedded-linux-arm-sfp.tar.gz
$ sudo tar xzvf jdk-7u10-ea-fx-8_0_0-embedded-linux-arm-sfp.tar.gz -C /opt/java
Finally we need to add the JAVA_HOME variable to the .bashrc file so it is set for every shell session
$ echo export JAVA_HOME=/opt/java/jdk1.7.0_10 >> ~/.bashrc
$ echo export PATH=\$JAVA_HOME/bin:\$PATH >> ~/.bashrc
If you now try to start java you should get an error like the following
/opt/java/jdk1.7.0_10/bin/java: No such file or directory
or if you’re already one step further this one
/opt/java/jdk1.7.0_10/bin/java: error while loading shared libraries: libgcc_s.so.1: cannot open shared object file: No such file or directory
I’m totally new to the embedded business so please spare me, but as far as I found out, the above mentioned java version goes well with ARM softfp shared libraries for armhf. So we need to install a special version of libc6 for java on our Nvidia Tegra (ARM Cortex-A9) and also the according “gcc1” version:
$ sudo apt-get install libc6-armel libsfgcc1
After this you should be able to run the “java” command successfully:
$ /opt/java/jdk1.7.0_10/bin/java -version
  java version "1.7.0_10-ea"
  Java(TM) SE Runtime Environment (build 1.7.0_10-ea-b08)
  Java HotSpot(TM) Client VM (build 23.6-b03, mixed mode)
To be continued…
As this post is already rather long, I’ll continue the findings on JavaFX in a follow-up post. In the meantime you can follow me on Twitter to stay up to date.
Any comments, optimization requests and suggestions are very warm welcome!